


Precautions before installation
Before installing the LED screen, we have to count the LED components shipped to us and make sure they are complete. If the LED components are missing or damaged, we should contact the supplier in time. At the same time, we should prepare the tools and protective equipment for installation, to do safe assembly and prevent accidents.
LED screen installation with cabinet
Survey of the installation location
Surveying the installation location helps us to understand the surrounding situation and take corresponding measures according to the surrounding situation. In this regard, we mainly consider the following three points:
Terrain: check whether the terrain of the installation is flat. In case the terrain is flat, it is convenient for the installation of LED display. If the terrain is sloping, LED screen truss structure needs to be adjusted.
Weather: Check the local temperature, humidity, wind and other weather information. If the local weather conditions are bad, then the LED screen should be reinforced on the basis of the original installation to eliminate the collapse phenomenon.
Foot traffic: check whether there are pedestrians passing by the installation location. In the event that there are pedestrians passing by, then on the basis of not obstructing the traffic, the guardrail should be surrounded at 50m of the installation location to prevent pedestrians from entering by mistake and reduce the probability of accidents.
Installation Distance: Calculation, Measurement and Positioning
After the survey of the installation location is completed, we have to calculate the length, height and thickness of the LED screen, and the total size of its truss should also be calculated, to ensure the accuracy of the installation.
Finished calculating, you can use the laser level or measuring tape to measure the installation position, and use the marker or sticker to the important position of the fixed point, so that the installation of the LED display screen is more accurate.
Build truss structure
Truss structure is what we often call steel structure. The construction material is usually a rectangular tube with a length of 6 meters and a cross-section of 2x2cm, 4x4cm or 4x8cm. The amount of material depends on the size of the LED screen, and we can choose the amount of material according to the design drawings of the truss structure.
The truss structure needs professional help, but if you have some welding skills, then you can try it. We have to build the frame according to the LED screen truss structure design drawings, first finish welding the big frame, then weld the small frame, and finally refine the frame structure.
When building the frame, we should reserve enough pedestrian access to facilitate the installation and maintenance in the later stage.

Install the cabinet on the truss
After the truss structure is built, you can place the LED screen cabinet in the lower left corner, this position is the starting point, and it should be spliced from here in order from left to right and from bottom to top.
Splicing between cabinets to find the positioning point, the upper cabinet slots aligned with the positioning point of the cabinet below, and the lock between the two cabinets fastened, in order to achieve seamless splicing.
After all the cabinets are spliced together, prepare the connecting piece and bolts, place the connecting piece behind the rectangular tube, align the screw holes on the cabinets with the holes on the connecting piece, put the bolts through these two holes and tighten them with a tool to ensure that the cabinets are securely mounted on the truss.

Connecting Cables
Once all of the above installation processes are complete, it’s time to connect the cabinets with cables to make them into complete screens.
In most cases, the internal cables of the cabinets shipped to us are well-connected, so we only need to connect the cables between the cabinets. The cables are generally divided into two types: data cables and power cables.
Whether it is a data line or power line, the connection is to comply with the principle of one in one out.
For example: if the left and right neighboring cabinets, then the cable is connected to the left cabinet by the right socket and the right cabinet by the left socket; if it is up and down neighboring cabinets, then the cable is connected to the cabinet below the upper right corner of the cabinet socket and the cabinet above the upper right corner of the socket.
The order of cable connection is also in accordance with the left to right, from bottom to top connection.
After the cable connection between the cabinet and the cabinet are completed, you can use the wire to connect the starting cabinet and the power supply, and the Ethernet cable to connect the starting cabinet and the video processor.

Commissioning the LED screen
Finish connecting all the cables, and then use a PC to connect the USB and HDMI interfaces of the video processor, where the USB interface is used to debug the LED screen, and the HDMI interface is used to transfer information to the LED screen.
Log in to the control system on the PC, use the control software to debug the LED screen until the LED screen shows normal, unplug the cable from the USB interface, and after that you don’t need to use the USB interface, you can control the LED screen directly through the PC.
If you choose the controller, then it is the same debugging method as above, except that after the debugging is completed, you can directly unplug the USB and HDMI interface line, with a cell phone or laptop and other devices with WiFi signals to control the LED screen.

No cabinet LED screen installation
No cabinet LED screen installation, in fact, is the LED display module direct installation. This kind of installation is more lightweight and flexible, and the appearance is more simple and beautiful. But its installation will be more difficult than the installation of organic cabinets.
The reason is that we need to assemble the power supply unit, control card, cable, LED module and other components by ourselves.
Survey, Calculation, Measurement and Positioning of Installation Location
The first step of installation is to survey, calculate, measure and position the installation location, these steps are the same as the installation of LED screen in organic cabinet, if you don’t know how to do it, then please refer to the page.
Welding and installing truss structure
Whether it’s LED screen in organic cabinet or inorganic cabinet, you need to weld the truss structure. For cabinetless LED screen installation, the truss material required is 40x40mm or 40x20mm rectangular tube.
The amount of material required is based on the arrangement of LED modules in height and length, the size of the LED screen and truss structure is calculated, and the frame is welded and divided into areas according to the designed truss structure drawing.
When the frame welding is completed, the whole frame should be erected and fixed with chemical bolts or expansion bolts to ensure that the frame will not fall off from the wall.
If it is a large frame, then you can use the crane or other equipment to assist in the installation. If it is a small frame, then it can be installed with the help of a ladder.

Installation of power supply and cables
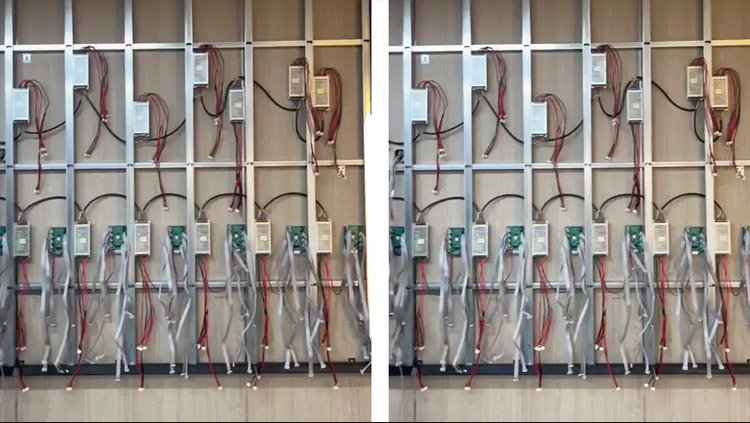
Once the truss is installed, we need to calculate the load of the power supply unit to determine how many LED modules it can support.
For example: 1 AC 200W power supply unit can load 4 LED modules; 1 AC 300W power supply unit can load 6 LED modules. The location of the power supply is then determined by the number of LED modules and loads in the vertical or horizontal direction.
After determining the location of each power supply unit, the power supply unit can be secured to the side of the rectangular tube using tie wraps, brackets, or self-tapping screws. Once secured, connect the DC 5v and AC cables to the power supply units.
Priority is given to connecting the DC 5v cable, which comes in two colors: black and red. We will connect the black cable to the negative terminal of the power supply, transmitting the “-” terminal, and the red cable to the positive terminal of the power supply, transmitting the “+” terminal. At the same time, connect the DC 5v cable to ground to minimize the risk of electrical connection.
Next, connect the AC cable to chain the power supply units together. Follow all electrical safety protocols during this process to eliminate electrical hazards.

Installing the Control Card and Connecting Cables
Before installing the control card, connect the flat cables, or rows of wires, to the control card. The connection is usually provided by the supplier and only needs to be assembled according to the configured installation documentation.
Place the control card with the flat cable attached in the truss area near the power source and secure it to the side of the truss with a mounting plate or screws to make cable management easier.
After installing the control card, use the network cable or Ethernet cable to connect the control card, the control card between the LED screen cabinet and cabinet is connected in series to ensure that each control card can receive the signal.
After connecting all the cables, check each connection point to ensure that the cables are firm and there are no obvious signs of damage can be.
Installing the LED Module
LED modules for direct mounting are generally designed with a magnetic attractor. When mounting an LED module, make sure the arrow on the back of the module is pointing to the upper right, then connect the cables to the power supply unit and control card, and finally carefully place the LED module on the truss.
Repeat the above operations until all LED modules are spliced. During this process, check that there are no gaps between the LED modules. If there are any gaps, then the slightly tilted LED modules should be re-spliced and aligned with the neighboring LED modules.

Configuration and Commissioning
After all the above installations are completed, press the button on the control card to test the LED screen. During the testing process, the screen will display different contents: red, green, blue, line, field, and integral information.
When the LED screen test process is completed, it is necessary to LED screen debugging, debugging methods are also the same as the organic cabinet LED screen debugging methods, are using the control system on the LED screen debugging and control.
Practical tips
LED screen installation will be more complex, in order to facilitate the installation, the following are some tips on the installation:
Understand the size of the LED screen: LED module size and number, cabinet size and number, power supply unit and the number of control cards.
Reduce the risk of damage: When installing, take precautions to prevent LED modules from falling or being damaged.
Understand the circuit load: Understand the electrical load requirements of the LED module, the load capacity of the power supply unit, and make it safe to use electricity.
Organize cables: Use cable ties to separate different cables to reduce the confusion and trouble during installation, which helps us to check whether the connection is missing or not.
Check the connection: Check each connection point to make sure the connected cables are firm and correctly connected.
Maintain ventilation: When truss installation, you need to leave some space to ensure that there is enough air flow around the LED screen to reduce the heat buildup when the LED screen is working.
LED screen maintenance: In order to facilitate maintenance at a later stage, make sure that all the components of the LED screen are easily accessible whenever we need them.
Conclusion
Through this post, I believe you have a general understanding of the steps and ways of installing LED screens in organic cabinets and LED screens without cabinets.
In case you have any doubts or don’t know anything about the installation process, then you can get in touch with JYLED, and we will guide you remotely. If necessary, we can also assign professional technicians to your location, directly help you install.