
Introduction
The video wall uses display technology to fix or map one or more display devices on the wall, so that the originally white, mirror-like wall can play a variety of wonderful pictures. If you haven’t decided yet what type of video wall installation to choose, this article is for you.
Installation of an LED wall in 5 steps
Step 1. Choose your video wall type
There are three most commonly used types of video walls – LED video walls, LCD video walls and DLP video walls. The performance and cost of the three vary. When choosing the video wall you want to install, you first need to select from them.
Let us first understand the differences between the three types.
LED video wall
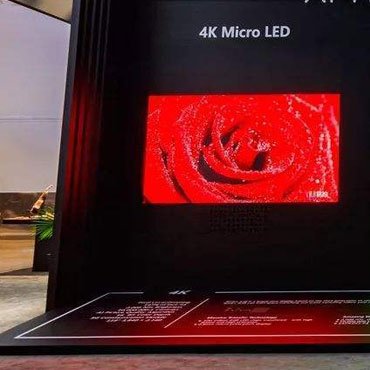
 JYLED HD LED VIDEO WALL
It has won the favor of customers with its superior display performance and seamless splicing. Moreover, with the research and development and improvement of LED display manufacturers, the naked-eye 3D display technology originally used outdoors can now be applied indoors, which will undoubtedly open up more indoor application scenarios.
It’s no wonder that LED video walls have been eroding the share of other video walls in recent years, and sales have continued to rise.
LCD video wall
 As can be seen from the above picture, the display effect of the LCD splicing video wall is good, but it can not eliminate the strange black edge
When the size of the video wall you need is relatively small, it will be more cost-effective to choose LCD. However, when the size of the video wall you need is relatively large, the LCD will produce black edges during the splicing process, affecting the viewing effect. Secondly, The price will also be more expensive than LED video wall, so we would recommend choosing LED video wall.
DLP video wall
 A video wall projected by a DLP Projector
It mainly projects images on the wall through a projector, so compared to the other two video walls, it has the lowest price and does not require installation, saving cost and time. However, the display effect is poor, so the market share is smaller.
Over the years, many DLP video wall manufacturers have made improvements to the DLP video wall. The best among them is the three-color laser display DLP video wall created by VATION.
The basic principle of this technology is to use lasers to control high-purity laser light sources of the three primary colors of “red, green, and blue”, which is completely different from the traditional method of achieving color using a monochromatic laser plus a color wheel.
Three-color laser display technology is based on the mixing principle of three primary colors. The emission end controls the beam expansion or excitation of the laser light source of the three primary colors, thereby forming a higher-definition color image.
On the basis of inheriting all the advantages of digital display technology, it has also achieved major breakthroughs in colorimetry, solving the long-standing problem of “large color gamut color reproduction” in the field of DLP display technology.
However, the current market continues to be weak, coupled with the long-term poor performance of DLP video walls, it remains to be seen whether the market share can be reversed in the future.
Through the introduction of the three different technologies of LED, LCD, and DLP, I believe that the solution you want to choose next will be more clear. Since we are a professional LED display manufacturer and have rich experience in LED video walls, we will focus on further introducing LED video walls next.
Step 2. Clarify the location, size and budget
LED video wall is a special customized product. Once all information is finalized, it cannot be modified. Many customers before who struggled to install the LED video wall because they did not describe the dimensions clearly.
As a professional LED video wall manufacturer, we need to help customers who plan to install LED video walls to make the following suggestions:
Installation Location
 LED Video Wall Installation Location
The modules and cabinets installed indoors and outdoors are different. Indoor LED modules and cabinets are not suitable for outdoor use.
When the problem is relatively minor, the picture cannot be seen clearly due to insufficient brightness. When the problem is serious, it may cause a short circuit and cause a fire, thus causing a more important accident.
Therefore, determine the installation environment and location before proceeding to the next step.
Size
 Engineers Measure Dimensions With A Laser Corrector
Customers can first provide an estimated screen size based on the location where the LED display needs to be installed. Our professional team will provide a solution that is closest to your target size based on your estimated size.
Budget
The budget will determine the display effect of the final product. As we mentioned before, the LED video wall is a customized product and a lot of materials are used in its production. Although we see no difference with the naked eye, we will find the gap between them when under some instruments.
For example, if a low-refresh chip is used, although the displayed picture cannot be seen with the naked eye, obvious water ripples can be seen under the camera, resulting in poor shooting results.
The brackets inside the LED lamp beads are also different. Good quality LED lamp beads use copper brackets, but some LED display manufacturers use inferior quality iron brackets as copper brackets.
For raw material purchasers, you should know that the price of metallic copper is about 12–15 times higher than that of metallic iron. In other words, LED display manufacturers using iron brackets can make more than 10 times more profits.
If the customer has a low budget but wants to have a good display effect, then in this case, it is likely to buy LED lamp beads using iron brackets.
Step 3. Start installing the display
Build steel structure
 Set Up A Steel Structure To Hold The LED Module
In order to be able to firmly fix the LED video wall to the wall, we must first fix the steel structure before installation. With the load-bearing strength of the steel structure, we can easily fix the LED video wall to the wall.
Build LED module
 Put The LED Module Into The Fixed Steel Structure
After the steel structure is built, our next step is to build the LED module onto the steel structure. In this step, we need to observe the arrow direction of the module and build each LED module in the correct direction.
If the order of the LED modules is incorrect, it will cause abnormalities in the LED display screen, and it will be very difficult to debug at that time.
LED video wall protection border
 LED Video Wall Protection Border
We often see a black frame around the LED video wall in many scenes. This is the LED video wall that has been wrapped around the protection border. The purpose of the edging is mainly to prevent the LED modules placed around it from being accidentally damaged, and also to prevent some water leaking directly from the top from affecting the module.
Step4. Download and install debugging software
Different types of control cards are used, and corresponding types of LED display control software are required. For example, if you are using a grayscale control card, you need to download the grayscale control software.
Since most control system software only supports Windows operating systems, it is recommended to choose a computer with a Windows operating system and then download the control software corresponding to the LED control card.
View and download control software:LED Screen Control Software Download
Step 5. Software debugging
After completing the above steps, the LED video wall has been built, and all that remains is to plug in the power and perform screen debugging. Through debugging, lamp beads with abnormal display can be found and repaired, to achieve the best picture effect.
What if something goes wrong during the installation of the LED wall?
The LED wall cannot be lit or work normally
 Unlit LED Video Wall
Troubleshooting method: Check whether the power indicator light is on. If it is on, check whether the power cord and cable are damaged or loose.
Solution:
If the power indicator light does not light up, it means that the power supply is faulty and needs to be replaced.
If the power indicator light is on and there is no problem with the cable and power cord, it may be that the LED module is faulty and the LED module needs to be replaced.
LED wall screen is blurred
 LED Wall Screen Is Blurred
After the display controller is properly connected to the computer, HUB distribution board and display screen, +5V power supply needs to be provided to the controller to make it work normally (at this time, do not connect it directly to 220V voltage).
The moment the power is turned on, the display A bright line or “blurred screen” will appear on the screen for a few seconds. This bright line or “blurred screen” is a normal test phenomenon, reminding the user that the display is about to start working normally. Within 2 seconds, the phenomenon will automatically disappear, and the display will enter normal working status.
If the blurred screen phenomenon is not eliminated after 2 seconds, first use the debugging software to debug the screen and process it according to the displayed screen.
1.The scanned file is incorrect and needs to be reset intelligently.
2.The resolution ratio of is program wrong, or the effective width is too small.
- [Settings] → [Screen Parameter Settings], after modifying the screen size, send the program;
- [Settings] → [Hardware Settings] → [Receiving Card Parameters], modify “Refresh Rate”, “Gray Level”, “Priority Mode”, etc., so that the value on the right side of the cabinet information in the lower right corner is greater than the left one, and then click “Send”.
3.Use the wrong adapter board, such as the HUB75 adapter board for 08 interface modules.
4.If a color bar appears on the screen, should HUB75B-10 be checked?
When using an adapter board with 5/10 interfaces such as HUB75E-5/HUB75E-10/C15C/C35C, check HUB75B-10 in [Hardware Settings] → [Receiver Card Parameters] → [HUB Settings]; HUB75B-8, a 75 adapter board with 8 ports, cannot be checked.
5.The display on the right side of the screen is normal, but the display on the left side is blurry. The clock frequency needs to be lowered.
What may be the reasons for failure to load?
Failure to load may be due to the following reasons. Please compare the listed items with your operations:
- Make sure the control system hardware is powered on correctly. (+5V)
- Check and confirm that the serial port cable used to connect the controller is a straight-through cable, not a crossover cable.
- Check and confirm that the serial port cable is intact and that both ends are not loose or falling off.
- Compare the LED display control software and the control card you choose to select the correct product model, the correct transmission method, the correct serial port number, the correct baud rate, and set the control correctly according to the DIP switch diagram provided in the software. The address bits and baud rate on the system hardware.
- Check whether the jumper cap is loose or fallen off; if the jumper cap is not loose, please make sure the jumper cap is in the correct direction.
- If the loading still fails after the above inspections and corrections, please use a multimeter to measure whether the serial port of the connected computer or control system hardware is damaged to confirm whether it should be returned to the computer manufacturer or the control system hardware. Detection.
Conclusion
We introduced in detail the types of video walls, the installation of LED video walls, and the troubleshooting of LED video walls. After learning, we can also operate it at home. If you encounter problems not listed above during the installation process, you can seek our help.